Paper Towels

Paper Towels

In keeping with my Kitchen theme. Here’s a little device I found at Bed Bath and Beyond that has worked wonders.  It’s a one handed paper towel holder.

Now I know that I could use one of those screw in holders, but they’re fixed.  When you’re cleaning, you have to keep running back to the kitchen.  This guy can be moved and taken with you and still allow for one handed use.

As an added benefit, they’re not “adaptive” meaning they won’t cost you an arm and a le….  well just an arm in my case…  And they’re readily available.

I also found you can order them online, if that’s your preferred method.  Here’s one on Amazon.

P1000918

I also found that it didn’t come with very good instructions (at least the one that I bought) so here is how I use it:

Start by pulling a sheet out and look for the perforations.

With the perforations near the top of the side bar, fold the towel down so that it’s nearly vertical.

P1000919

Then, continue adding pressure until the perforations start to separate.

P1000921

And continue to pull down until the towel comes off.

The real trick to this is getting the perforations at just the right spot to separate easily.  I find that the closer to the edge of the holder it is, the cleaner the tear will be.

As you can see, in my haste using the timer on my camera to take these pictures, I screwed one up.  When the side bar isn’t near a perforation, it has a tendency to punch a hole in the towel.

This holder can take a little practice to use, over a permanently fixed paper towel holder, but It makes up for it by being portable.


Cut the cheese…

Cut the cheese…

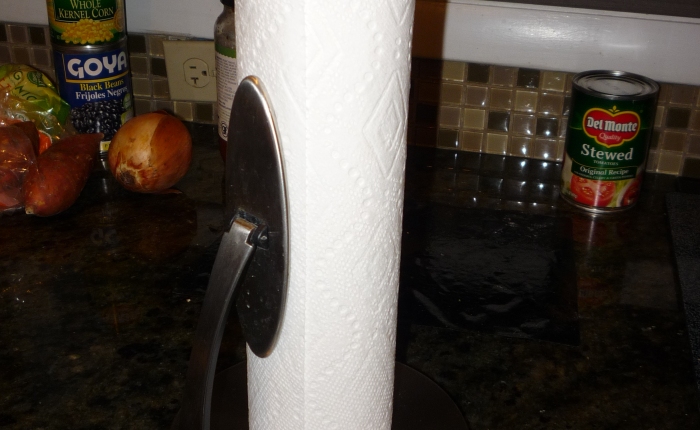
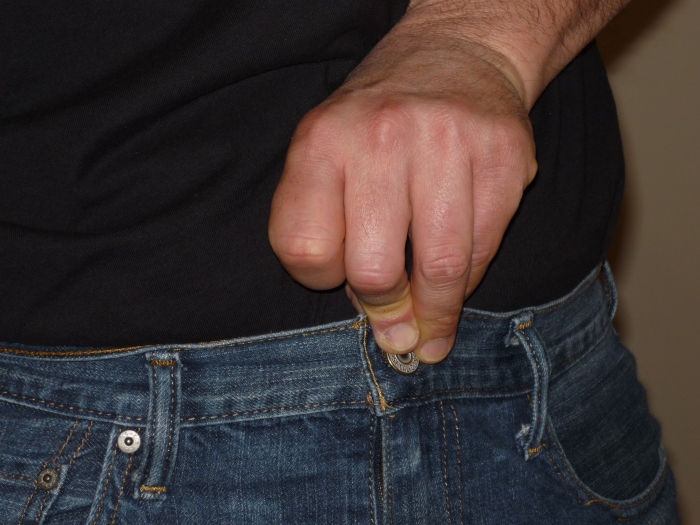
…and any other ingredient you need for cooking.  (Ah, juvenile toilet humor, it never gets old)

So you live alone like me and you’d like a little more than frozen microwave dinners and take out.  That means cooking.  I am by no means a chef.  In fact I choke down quite a bit of awful tasting food because I’m marginal at best, but in the end, this isn’t about that.  It’s about dealing with living independently, sans arm.

So if you want to cook, there are several things that you’ll need to do that generally requires two hands.  This post is the first of a few posts about navigating the kitchen mano e mano. Well maybe just mano e nothing.

BTW: if you can’t tell, my Spanish is about as good as my cooking.  Hell my english ain’t so good to…      …and yes that was a smart ass joke for you grammar Nazis.

Ok, back to cooking (or something resembling it) one of the first things you’ll need to do is cut ingredients.  This post is about how I go about that.

I use a few different tools for the job.  Some of these are adaptive tools and some are not.

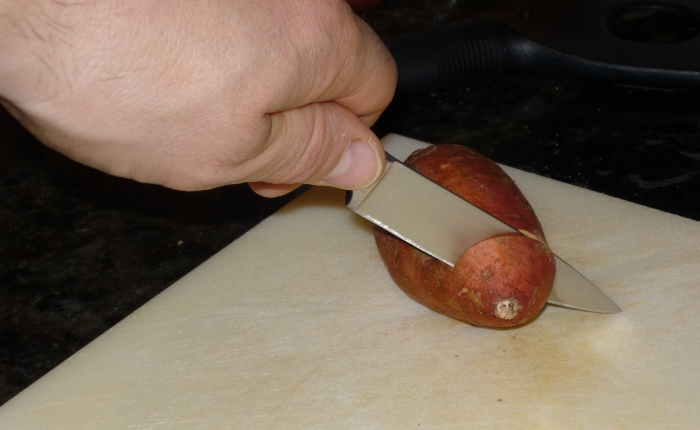
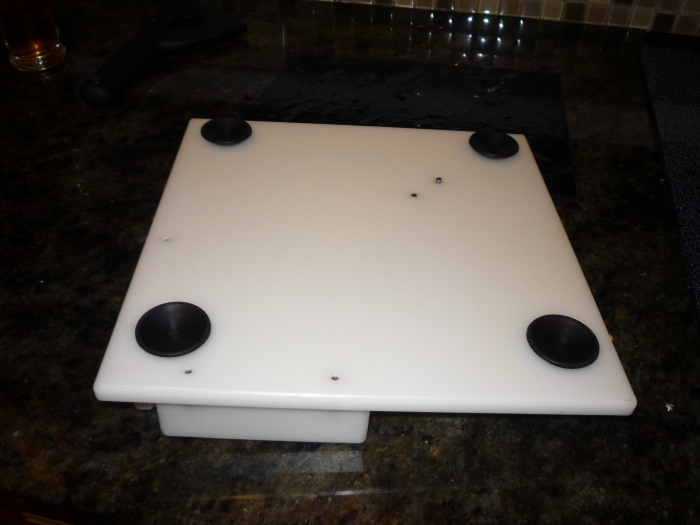
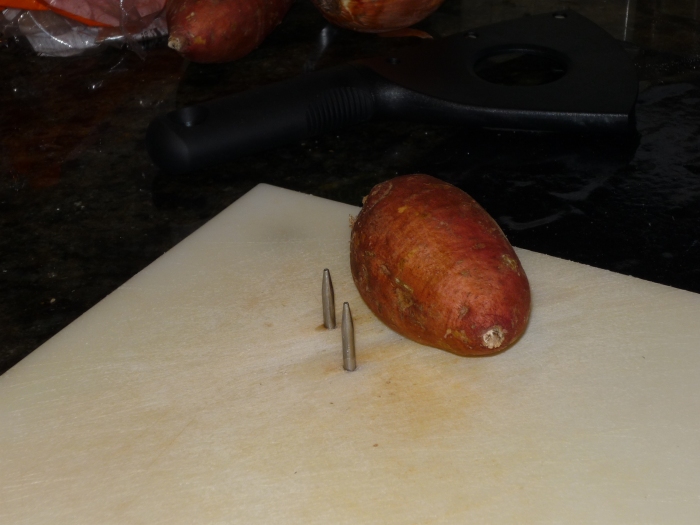
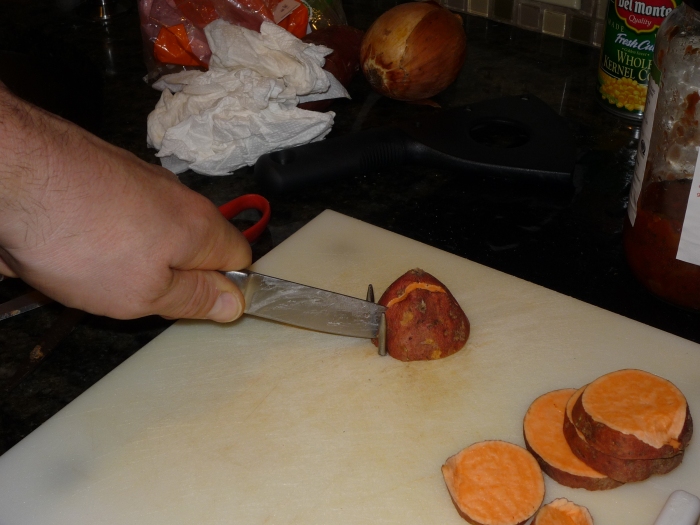
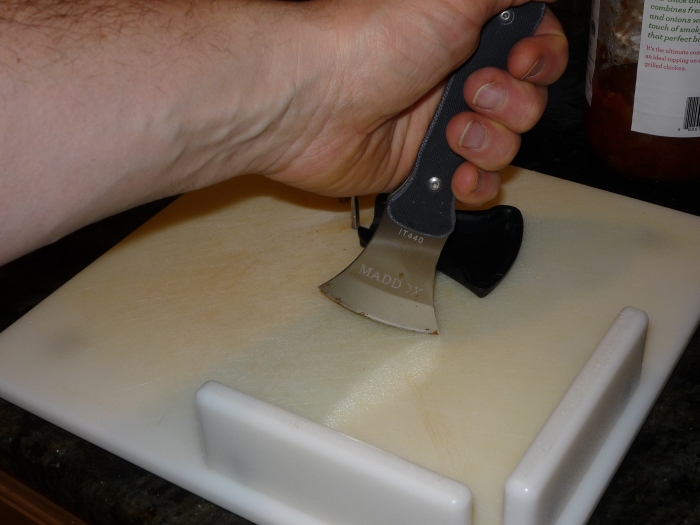
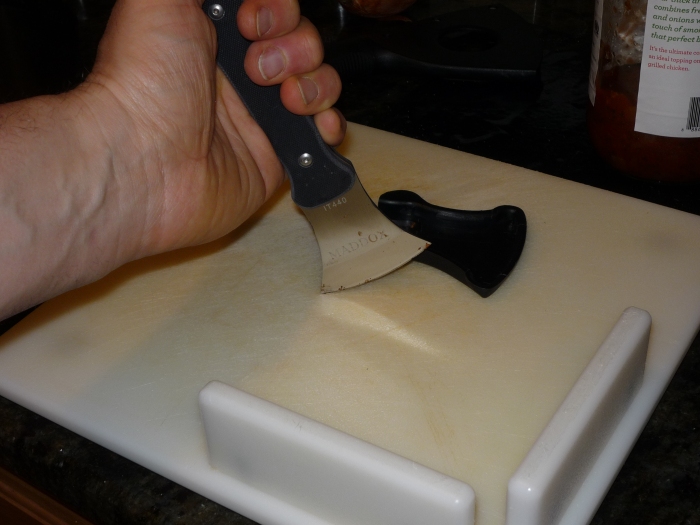
To start, I use a one handed cutting board.  This was a gift, but a quick Google search shows several different styles to choose from.   Mine has two stainless steel spikes and two sides.

P1000914

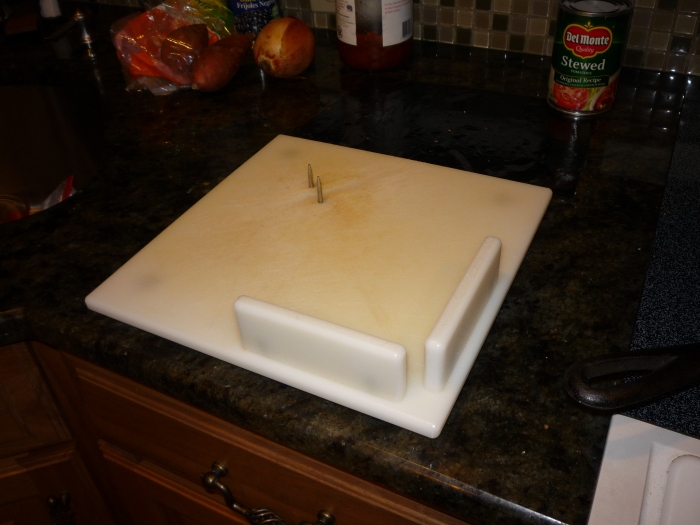
It has some suction cups on the bottom to help it stay put.

P1000940

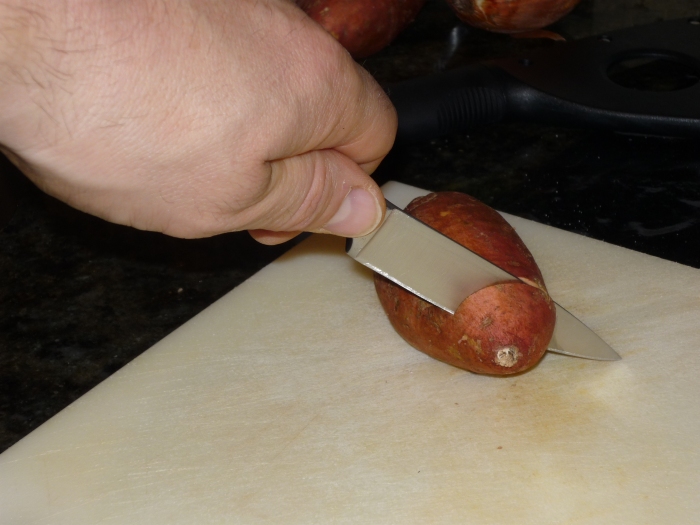
I use mine in several ways.   The first obvious way is to impale your food on the spikes.  Here I’m cutting a sweet potato with a pairing knife.

P1000927

P1000928

P1000929

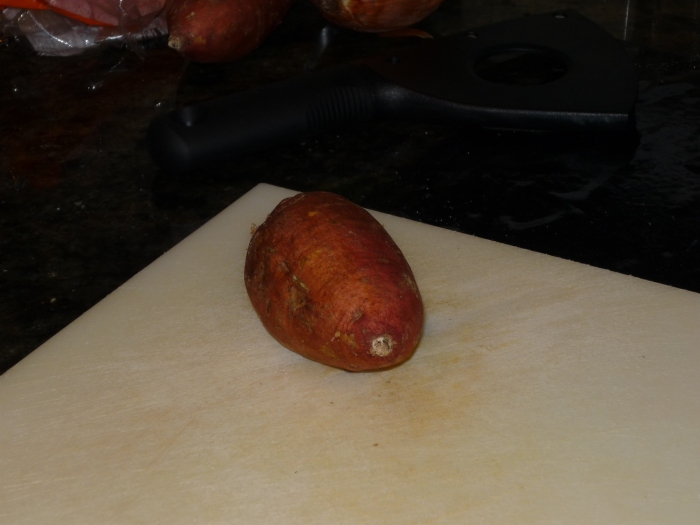
Some times it’s faster, with carrots, mushrooms and other items that you’ve already cut flat, to just use the spikes as way to keep the item still while you cut through it.

P1000934

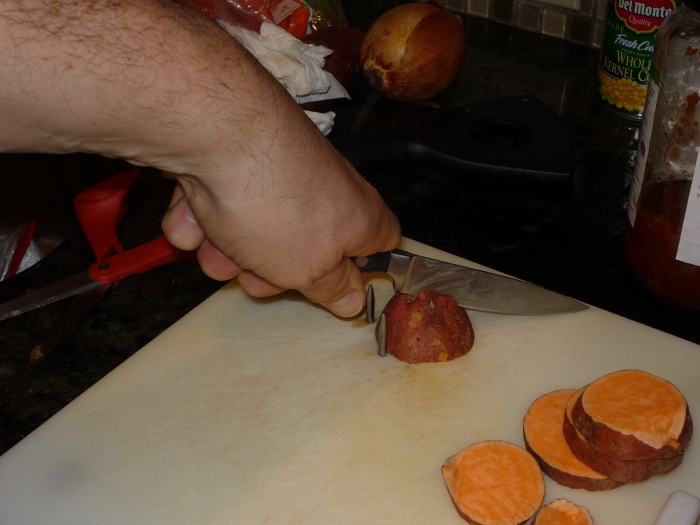
By placing the food against the spikes and drawing the knife through it.

P1000936

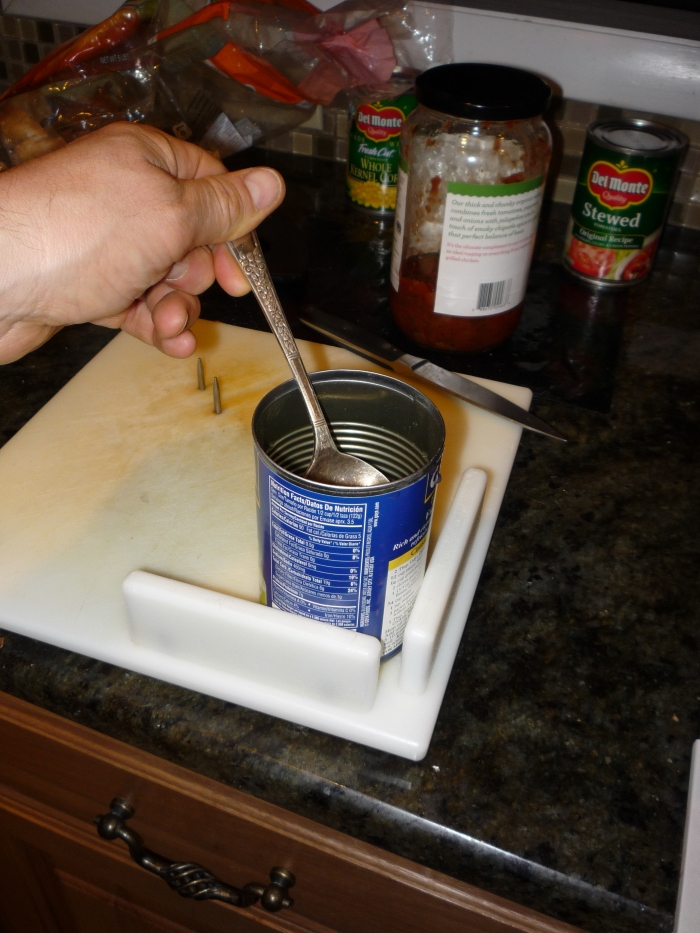
The side walls are supposed to be used for cutting a sandwich in half, I don’t eat many sandwiches so I haven’t used it for that.  But I do use the side walls for other things.  For instance, when trying to get the last few beans out of the bottom of a can, I’ll put the can in the corner and use it to push against, like so.

P1000938

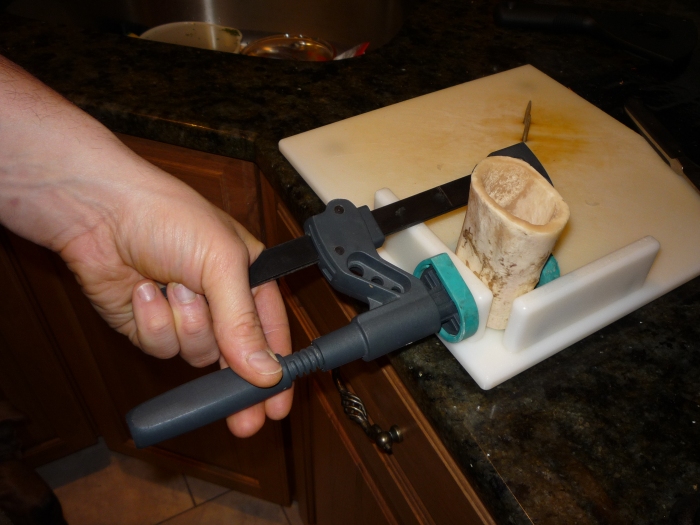
My dogs also like peanut butter filled bones, so I’ll clamp the bones to the board after washing them and use that to hold them steady for filling.

P1000939

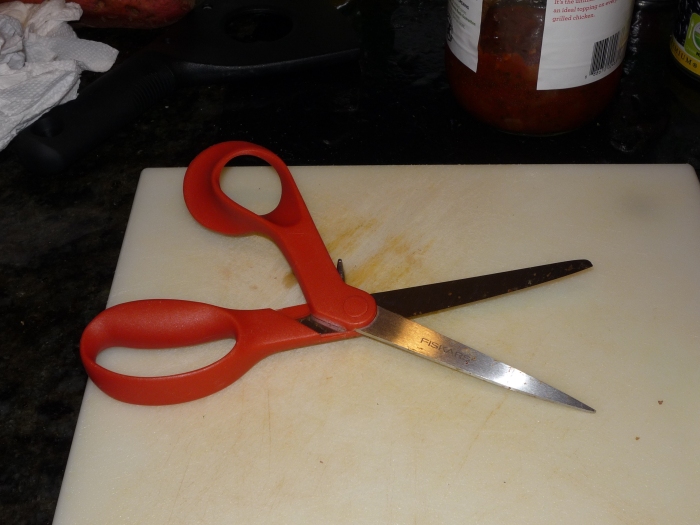
In addition to the cutting board, I suggest a good set of kitchen shears.  I use these for getting in to bags of chips, opening microwave steamed veggie packets and other things like cutting herbs.

I also suggest, if you’re like me and you lost your right hand, get them in the lefty model.  You’ll probably have to order lefty scissors online.  I wasn’t able to find them locally and trying to use righty scissors lefty was an exercise in futility.

…And there was much cursing and gnashing of teeth…

P1000937

Another great tool for cutting is a rocker knife.  Another adaptive tool, these come in several styles.  I have several.  One I keep at my mother’s house when I’m in the mood for good food, not the slop I make.

Maybe I’ll get some home made manicotti if Mom’s reading this (Nudge nudge, wink wink)  BTW, the correct pronunciation as Lawn Guyland Italians say it is… mon-i-CAWW-tee..  There, that wasn’t so hard now was it?  But I digress….

I usually use the rocker knife for cutting thawed meat on the cutting board or the somewhat cooked meat at the dinner table.  As Mel Gibson said in Braveheart… “You can take my arm, but you’ll never take my taste for a nice rare steak!” Or was it something about freedom? Whatever….

This knife allows you to use downward pressure and a rocking action to cut through your dinner.

P1000925

P1000926

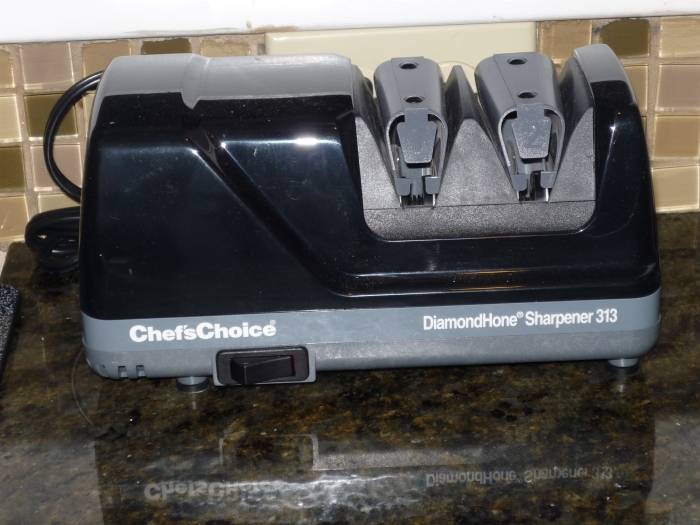
Lastly, in order to make using the cutting board easier, a sharp knife is imperative.  A sharp knife is a safer knife.  But be careful, as I’ve stated in other posts, you and I are already missing enough body parts, so pay attention and don’t blame me, I warned you….  Don’t be a dumb ass…

Anyway, to keep my knives sharp, I use an electric knife sharpener.  I got mine at the local warehouse club that sells peanut butter by the truck load.

..And there was much dog rejoicing at the sound of that in my house…

You just turn it on and if you’re a guy like me, you ruin a knife, swear, and THEN read the directions… Replace said ruined knife and sharpen away.

P1000941

More kitchen posts to follow….

Addendum….  I almost forgot…

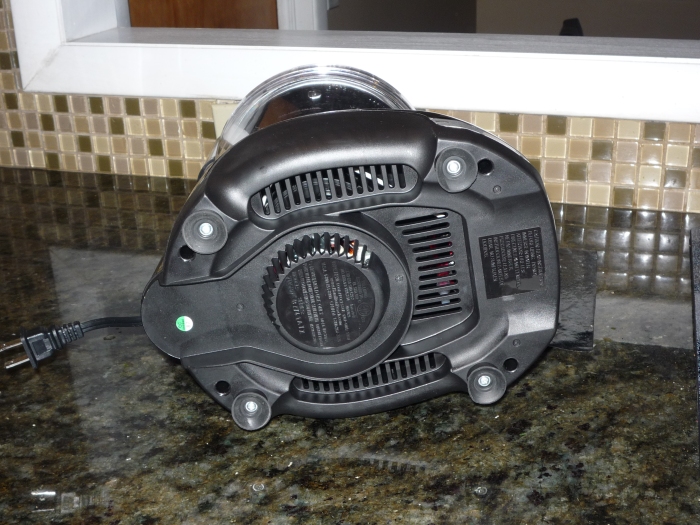
One more cutting tool, for the bigger jobs, the cutting board can take too long.  For these things, like when I make 4 Gallons of my step fathers Hot Pepper salad recipe, I use a food processor.

P1000949

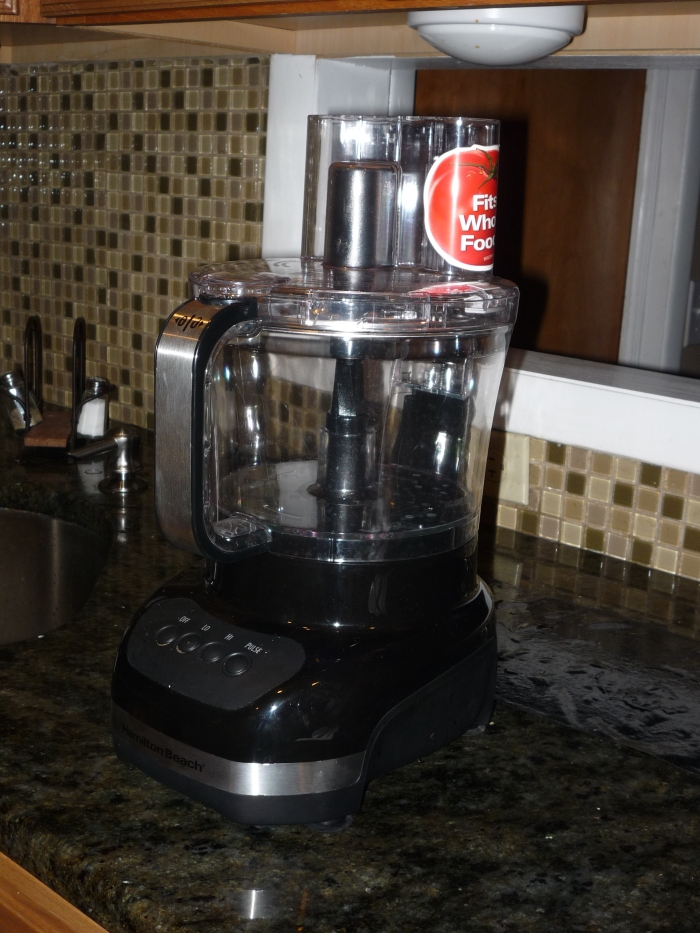
I made sure that the one I bought had suction cups to hold it in place..

P1000947

Ok, NOW there are more Kitchen posts to follow….

Fish Tank Stand

Fish Tank Stand

So this post is something I did a year ago.  I built this without any Adaptive tools.  The blog wasn’t a thought yet, so I don’t have a lot of pictures of close ups of how I did things one handed.  That said, I do think it’s worth posting to show you that working with your hands….  err hand…  can still be done.

One thing to note; before I lost my arm, I was somewhat handy (Pun intended! LOL).  So I already had a lot of the tools I talk about in this post.  The investment in tools is somewhat significant, just so you know that going in.

So this project got it’s start with the purchase on my house (I closed just 8 months after my arm was ripped off, yes you can do this!)  I’ve always had aquariums since I was a kid and I wanted an aquarium in my living room of my new house.

My new house has these built in shelves in the living room. but the bottom shelf was lower than the top of the tank when the tank was on a standard height tank stand.  That means I had to build a custom stand to fit my needs.

Before I get in to the build, please note that this project involves power tools.  These tools are designed for 2 armed freaks.  Us one armed normal people, have to use them in a capacity that might not be as intended.  THESE TOOLS ARE DANGEROUS! Use your BEST JUDGEMENT! Be careful, you and I can not afford any additional lost body parts!  Think before you use the tools and for God’s sakes PAY ATTENTION TO WHAT YOU’RE DOING! Try this at YOUR OWN RISK!

End disclaimer…….

The start of the project was planning the build.  I started by measuring the distance between the floor and the bottom of the shelf, then I subtracted the height of the tank and light fixture to give me the height of the stand.  The depth and width were determined by the foot print of the tank.

I started the build by building two rectangles who’s outside dimensions matched the outside dimensions of the footprint of the tank.  I cut the 2×3’s I used with my compound mitre saw.

P1000763

I then built the frames by camping the 2x3s together with right angle clamps.

P1000764

P1000765

P1000767

I nailed the frame together after getting the frame clamped with my pneumatic framing nailer.

P1000768

P1000769

The next step is to to finish building the box that the frame of the stand.  I do this by clamping and then using my pneumatic nailer.  I use these Irwin One Handed Clamps.  I got mine at Lowe’s.  These clamps rock for an upper limb amputee and I use mine for a ton of tasks beyond aquarium stands, you will probably see these again.

P1000770

P1000772

P1000773

P1000774

To skin the stand, I used melamine panelling.  Also secured from Lowe’s. The trick with this was I already had my measurements.  I had the dude at Lowe’s use the panel saw in the lumber department make my cuts.  They made the sides and the front.  (There is no back on my stand so the hoses and wires can pass)  That machine will make a straighter cut in shorter time than even the most capable two armed freak of a carpenter!

I clamped the sides to my frame and then used my pneumatic finish nailer (I love air tools) to attach the panels.

P1000791.JPG

After attaching the sides I temporarily attached the front to measure for the cabinet door openings.

P1000793

After measuring and marking, I clamped the top down and used my level as a saw guide.  I used my drill to put a starter hole in and then used my jig saw to cut out the openings.

P1000794

After cutting out the openings, I used the pneumatic finish nailer to attach it.  See the small hammer, I used that to drive the nails flush to the surface of the fascia.

P1000795


P1000796


P1000797

Next it was time to build the doors.  I used pine panels and cut them so that they were 3/4’s of an inch bigger than the openings all the way around.

P1000800

I then used a forstner drill bit in my table top drill press to cut the holes for the cabinet door hinges.  I also drilled the holes for the door pulls at the same time.

P1000801

P1000802

P1000803

Next using moulding, my chop saw and clamps, I cut the moulding to finish the edges of the cabinet.  I used my small pneumatic brad nailer to attach the moulding.

P1000805

P1000804

P1000808

P1000806

P1000807

Next, I used my router with a round off bit on the edges of the doors. Note, this is particularly dangerous, a router is designed for two handers.  I have more determination than sense, do this at your own risk!

P1000813

Next I stained the cabinet ebony stain to match my furniture and afterwards coated it with polyurethane.

P1000815

P1000814

Then I assembled the doors, hinges, door pulls and fish tank in my living room.

20140524_123812

20140525_092851

After a year establishment, here’s what it looks like in my living room.

20151114_165002

I built mine with one hand and ingenuity, you an do it too!  Hell Yea!!!!!

Clothing Zippers

Clothing Zippers

Zippers are my nemesis!  Oh you little evil things!

In actuality, the ones that exist on my sweatshirts and jackets I have mastered.  It’s the little bastards that exist on small bags like my travel shave kit and my growler carrier that are evil beings!

All kidding aside, you’re here to find out how to zipper your jacket one handed.  This is another technique that I had to figure out on my own.  Lets get to it…

I start by lifting the side of the sweater that has the zipper pull on it and pinching it between my chest and my chin.  Making it short allows me to see what I’m doing and also prevents the pull side from moving around to much as I insert the other side.

P1000905

Next I insert the other side in the normal fashion.

P1000906

I use my thumb and index finger to pull down on the side without the zipper pull and my middle finger to push up on the bottom of the pull to hold everything together.  While doing that I let go with my chin and lower the shirt.

P1000907

I stretch the shirt to get the sipper as straight as possible.

P1000908

Using my thumb and Index fingers on the zipper pull  and my middle and ring fingers to hold the shirt, I work the pull up the first couple of teeth.

P1000909

Then just work the zipper up repeating these last two steps.

P1000910

And here’s the obligatory video of the technique in action.

Shirt Buttons

Shirt Buttons

As promised in my previous post, I want to show you how I button my shirts.

This technique is a little different and a little bit the same.  So follow along…

As before, I start by grabbing the button hole side.  This time using my thumb to both find the hole, and open it.

P1000897

I pull the hole over to the button and start to thread the button in to the hole.

P1000899

As the button comes through the hole, I tip it up on end and use my index finger to slide the shirt down over the button.

P1000901

Then with my index finger and thumb, I twist the button, which pulls it through the rest of the way.

P1000902

Here it is buttoned.

P1000903

And here’s the video of the process in action.

Pants Buttons

Pants Buttons

After the wreck, I had to figure out how to get dressed on my own.  This and the next two posts will be about dealing with that.

So after my hospital stay, I ended up in a Rehab facility.  While there I had Occupational Therapy.   While the OT therapists were good, they didn’t have much experience with an Arm Amputee. And why should they?  80% Of upper extremity amputations are just fingers and even then upper extremities only account for 5.4% of all amputations.  (These numbers come from the Amputee Coalition numbers for New York which is where I live and the wreck happened.. At the time of this writing, I’m not in anyway affiliated with the Amputee Coalition) Due to their lack of experience, they weren’t able to effectively teach me techniques for day to day living without my arm. So I had to use my strongest muscle, the one between my ears.

Let’s get started..

When I was in rehab, OT  got me these button tools.  They’re a wire loop on a handle that allow you to guide the button in the hole. They work, but they are accessibility tools, as I’ve mentioned in other posts, I try to avoid accessibility tools when I can. If you forget to bring it on vacation, you’re screwed.  Also it’s one more thing you have to bring and when you travel by motorcycle, like me, the less crap you bring the better!

I also found that they get hung up on the button making them difficult to work with and more importantly, I found I don’t need them.

P1000913

Let me show you how I button up.  I use two different techniques, one for my pants and one for my shirts.  Since I put my pants on first, I’ll start there.  I’ll document the technique for shirts in a second post.

In the pictures, I’m wearing loose fitting jeans to make taking pictures easier.  I also suggest you learn this technique with loose fitting clothes as it’ll be easier to learn.  Once you get the hang of it you can go back to wearing your skinny jeans. (I hate to see her leave, but I love to watch her go…)

I start by putting my middle finger through the button hole.

P1000887

Then pull the hole side of the pants to the button side, with my middle finger and grab the button side with my thumb and index finger.

P1000888

Now using your middle finger, find the bottom of the button.

P1000889

Next you’ll use your middle finger as a guide by tipping the bottom of the button up with your middle finger that’s still in the button hole.

P1000891

Then using your Ring Finger and your Index finger, push the button hole side of the pants down over the button.

P1000892

At this point the button is at a 45 degree angle and almost all the way through the hole, to hammer it home, just press down on the bottom of the button with your middle finger and upward angle on the thumb, while still holding the hole side with your index and ring fingers.  This rotates the button from 45 degrees to 90 degrees perpendicular to the floor and pushes it the rest of the way through the hole.

P1000893

P1000894

Here’s the video of it in action:

Picking Up Leaves

Picking Up Leaves

This post will be a bit longer than my previous two.  It involves that yearly job of cleaning up the leaves from the yard.

Before I begin, let me start by saying that in order to do this, I disable the Dead-man switch on my lawn mower.  I will show you how I do this.  However, THIS IS DANGEROUS this switch is a SAFETY FEATURE of your lawn mower, use this tip with caution and use this tip AT YOUR OWN RISK.  Think before you do this, if you’re reading this because you’re like me, YOU CAN’T AFFORD TO LOSE ANY MORE BODY PARTS!

OK, disclaimer aside, let’s pick up some leaves, shall we?

So I don’t manually rake my yard.  Power tools baby! OO OO OO!  (That’s my best Tim Allen impression deal with it!)

Here’s a list of tools:

  • My Leaf Blower
  • My Lawn Mower
  • A Cable Cuff
  • 4 A Clamps
  • A Garbage Pail
  • A Rake with Easi Grip handles and Arm Cuff (Available on Amazon)
  • A yard cart for moving the gear and full bags of leaves around

So here on Long Island the local blowhards… err… politicians require that we bag our leaves.  So that is what we must do.

I use a leaf blower to blow the leaves in to piles.  Mine is a gas blower. So obviously I have to gas it up first.  Since it’s a pain in the ass to tip the gas can up one handed, I use a fuel siphon.  Mine is the fancy powered one that uses a D Battery, but you can use the manual ones too.

The Battery units are available at your favorite big box hardware store for about $15 bucks.

7fa1a690-4de7-46ac-b95e-75dbfd6ee54b_400

And the manual ones are about $7

k2-_a5c8c145-1172-4418-9fb7-cefdb619dc43.v1

So to start the blower, I place my left foot on the bottom of the blower and my right on the top to hold it down while I pull the starter. You’ll have to modify this technique for your equipment.

20151107_133007

The only difference between blowing the leaves as an amputee and blowing leaves before I was an amputee, is that now I have to put my beer down while I blow the leaves.  So I won’t spell out how to get them in to a pile, you should be able to figure that part out.

However, I do use a rake to get in the corners and in the tight spots.  Here’s a close up of the rake handle with the Easi Grip on it.  This is the only “accessibility” aid I use for leaves.

20151107_133042

So once you get the leaves in to a pile, it’s time to pick them up.  I use my lawn mower as a leaf vacuum.  Most modern lawn mowers have a bar that if you let go will shut the mower off, this is the Dead-man switch.  Well lets just say trying to use that bar and start the mower all with one hand is an exercise in futility that leads to teaching the neighborhood kids some new four letter vocabulary words!

So to get the mower started with as few colorful words as possible, I use a Cable Cuff to clamp the Dead-man switch in the run position.  This little bugger is about $3 bucks at your favorite purveyor of tools and yard equipment.

Reminder: DOING THIS IS DANGEROUS SO DON’T BE A DUMBASS! Pay attention and keep all fingers and toes (that you have left) away from the exposed moving parts!

Here’s a picture of the Cable Cuff holding the Dead-man switch closed.

20151107_132144

Next just run the lawn mower over your leaf pile until the bag fills.  The next step is to take a leaf bag and put it in a garbage pail, using the A clamps to hold the bag open.

I pre-stage the A clamps on the pail as I open the bag and drop it in.  Then, to get it started, I’ll hold the edge of the bag against the top of the pail with my stomach while I clamp the A clamp on the bag. I then work my way around the top.

20151107_132156

Now just take the bag off the lawn mower, doing this will depend on your equipment, for my lawn mower, I use my right knee to hold the spring loaded door open and then use my left and only hand to remove the bag. I set the bag down and lean the bag on my left shin to move my hand around the handle to lift it up.

Here’s a picture of me doing that:

20151107_132253

Ok got that? No? What do you mean no? OK…  I got you..  Here’s a YouTube Video of me doing that in action….

So now you have the leaves in the bag, now what, how do you get them tied up and to the curb?

Well I’m glad you asked.  (Bear with me as this was hard to photograph, you will be rewarded with video at the end, I promise)

Start by getting a twist tie and holding it in your mouth.  Then take the A clamps off the bag and gather the bag at the top.

While holding the top of the bag closed, tip the garbage pail on its side. (There is already a tie on the bag just for this picture, at this point you won’t have one on yet)

20151107_132828

While holding the bag closed (so you don’t dump any leaves), place your foot on he garbage pail (As a lefty, my right foot is better).

Then drag the bag out of the can.

Next, you’ll reverse your hand on the top of the bag and spin it to twist the bag closed. (Watch the video if this doesn’t make sense)

After taking it for a twirl, pinch the top of the bag between your legs and using the twist tie in your mouth tie the bag closed.

20151107_132933

Repeat as necessary until done with the leaves in the yard!

So here’s how that looks in a video:

I’ll leave the bags where they lay around the yard as I bag and then use my garden cart to haul them to the curb.

20151107_132208

The bags at the curb..

20151107_135824

My neighbor’s yard:

20151107_135613

And My yard… Can you say “anal” boys and girls, I’ll bet you can!

20151107_135609

Sweep the Floor

Sweep the Floor

So as a divorced home-owner, I have keep my house clean.  There’s no one but me who’ll do it, so one thing I have to do is sweep.

Now as you read this post you’ll be saying, “Hey, didn’t the about page say he wasn’t going to use adaptive tools?”   Well Ha! if you go back and read the page it says “…try not to use whenever possible…”

So yea, this post includes adaptive tools… sue me.  LOL

So here it goes, I found these Easi Grip Add On Handles and the Easi Grip Arm Support Cuff.  Those links are for the manufacturer’s site.  They’re a product of the UK.  They’re also available on Amazon which is where I got mine.

Here’s what it looks like on my Broom….P1000877

P1000876

So I generally sweep using that.  Then comes the fun part of picking up the dirt…

To do that I use a standard dust pan.

P1000874

I use my foot under the handle to tip the dust pan up enough to capture the dirt and leave as little of that annoying, it won’t go in the pan line that’s left behind….

P1000875


Pour a Beer

Pour a Beer

Lets get started with one of the first techniques I learned (well after walking that is)

So I couldn’t grab a picture, but to open the bottle, I put the bottle between my knees and use a regular bottle opener to pop the top of my favorite adult beverage….

One open Beer and one empty glass…

P1000879


I start by grabbing the bottle with my pinky and ring finger.  I use my middle finger, index and thumb to grab the glass.

P1000880


I then gently tip the bottle up using my wrist and lean the glass over with my fingers, getting the perfect pour down the side of the glass….

P1000878

About

About

Hi!  Thanks for stopping by! This page is intended to share tips and techniques that I’ve personally came up with in order to live my life as an amputee.  I’m posting them here in the hopes that they may help others too.  And maybe along the way some of you could teach me a thing or two.

I intend to post as I can, sometimes you you may find tons of new stuff and other times…. well crickets…

When I lost my arm, I found myself in Occupational Therapy.  The therapists weren’t used to having to deal with  arm amps, since there aren’t many of us.  So I’ve had to be inventive along the way.  Also, I try not to use “adaptive” tools when ever possible.  The reason is that there’s always a hardware store, supermarket, variety store, etc, near by.   There is almost never an “adaptive” store around so if you forget, lose or break the needed widget, using regular items means what you can run out and get one.

Before I get started, a little about me, not that you care, but hell this IS my page after all.

My story of becoming an amp started back on June 8th of 2013 I had a motorcycle wreck. Going in to a left hand turn at about 45-50 mph the kickstand on my chopper deployed.  I couldn’t make the turn and I hit the guardrail.  I was thrown, and hit the vertical support post of the guardrail with my shoulder, ripping my right arm from my body and whipping me around.  That broke my femur in to places, fractured 4 ribs, lacerated my liver, gave me 6 stitches in my left, a huge bloody lip and 3 broken vertebrae in my neck.  Yes I can actually say that becoming an amp was a pain in the neck..  badump bump..

So lets begin, shall we?

You’ll find my articles on the left side of the page listed under How-Tos.

20150802_182707